Installing a breather on a vintage Triumph twin
Nobody likes finding oil under their vintage bike, but it is a frustrating reality for most owners of vintage or antique British twins. In the past, I've restored a lot of Japanese and German bikes, so I don't expect leaks and if it's leaking, I know there's something wrong. But ever since I purchased my first BSA Lightning back in the late 1970s, I've been cleaning up oil spots under my British bikes. Tired of buying rolls of shop towels, I began looking for ways to plug up my favorite British twin. Like any other mechanic, I originally determined the issue had something to do with bad O-rings and gaskets, so I started chasing down numerous areas where oil could potentially leak. I spent a lot of time focused on the rocker boxes and oil tubes. And to a certain extent, that was a logical place to start. But after replacing almost every gasket, O-ring and crush washer I could find on my 1968 Tiger 650, I still found a few drops of oil under the bike after a short ride. I finally traced the leak to the breather under the primary cover. And I now know, unless checked, this will almost always be a source of oil leaks in Triumph twins.
On my 650 Tiger, there's a rotary breather valve on the the end of the exhaust camshaft that releases crankcase back-pressure into the primary case. Accompanying those pressurized crankcase gases are trace amounts of oil. It's not a lot, but it builds up. After a ride, oil will inevitably gather under the primary cover and eventually stream to a point where it will end up on my garage floor.
I knew vintage road racing rules frowned on bikes leaking oil on a track, so I sought advice from mechanics involved in vintage road racing. I figured if anybody knew how to keep a bike dry it would be them. I ended up taking their advice and I've had pretty good luck so far. The tricks range from obvious to difficult. I'll share what I've found below:
Triumph Unit Twin Simple Fix
|
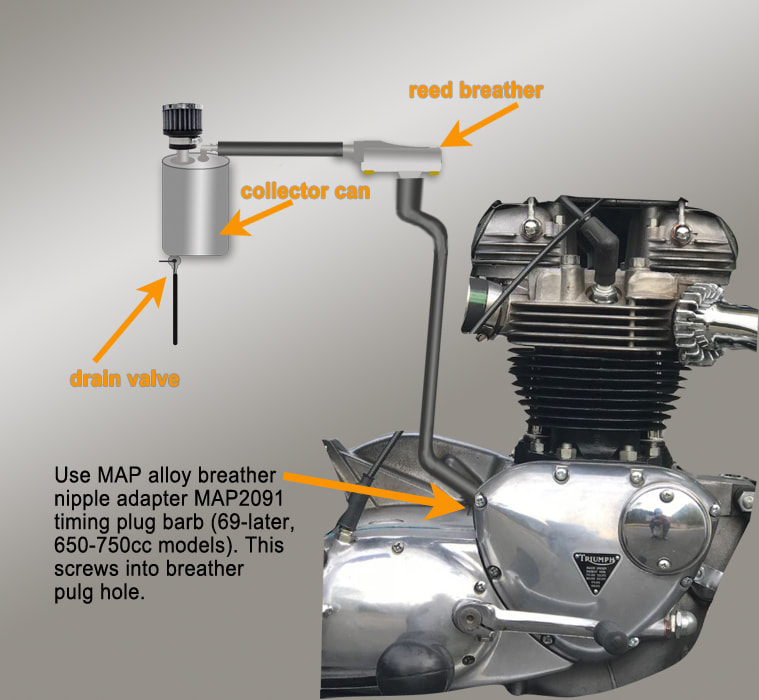
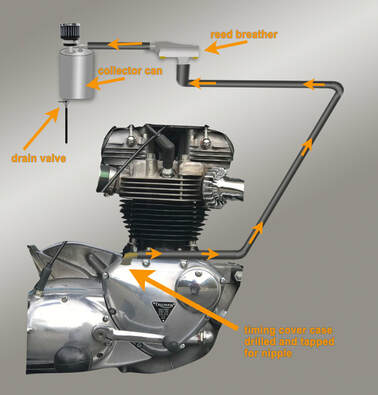
This diagram shows how I vented crankcase pressure on my '68 TR6. It's simple, straight-forward and it works well. The unit Bonnevilles and Tropy/Tiger 650's have a timing plug that can be easily removed and replaced with a nipple. MAP sells a kit with the a reed breather, nipple and hoses. If you have a pre-1968 Triumph, the nipple can be used, but because it is CIE thread, it will only thread in a few turns before it gets tight (unless you want to re-tap your case). A little Teflon thread tape or pipe dope keeps the nipple from leaking around the threads.
A similar system could be applied on almost any bike that has a crankcase vent. For instance a lot of Honda twins and fours have a vent plug coming from their rocker covers. You'll notice I use a catch can. I first tried the MAP kit with just the breather. It helped but I still had some dripping from the breather. |
I've found the reed breather is a good thing to have because it allows the crankcase gasses to travel in one direction. Gases travel out, but can't be sucked back in. To capture those final drips I needed something more, like a catch can. MAP doesn't sell one so I set about making my own. I had seen beer cans and old oil cans used on Harley's and British bikes in the past. But I wanted a sleeker more purposed look. I had hoped to find an aluminum vessel on eBay to use as a jumping off point, but I stumbled on a bunch of Chinese-made, purpose built cans for the hot rod market. I quickly found a polished aluminum unit with a built-in, filtered vent. It was $39, but it saved me at lease three to five hours of work. All I needed to do was to install a drain petcock (more about that later). I turned out to be a simple and cheap solution that looks great too.
As with any system, there is a downside. I really like my bike to have a clean, original appearance. With this breather, you've eliminated oil dripping but you've added a somewhat unattractive oil tube running from the crankcase to the backbone of the frame. Some custom engine builders might seek a more attractive solution and I'm sure you could make this look better with a custom, braided, stainless steel breather tube, but that could get a bit pricey. If this sounds like it could be an issue for you, you might want to consider the alternative below.
As with any system, there is a downside. I really like my bike to have a clean, original appearance. With this breather, you've eliminated oil dripping but you've added a somewhat unattractive oil tube running from the crankcase to the backbone of the frame. Some custom engine builders might seek a more attractive solution and I'm sure you could make this look better with a custom, braided, stainless steel breather tube, but that could get a bit pricey. If this sounds like it could be an issue for you, you might want to consider the alternative below.
|
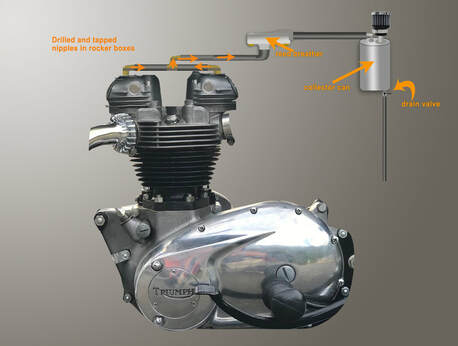
A more elegant solution - Rocker Box venting
For years, Triumph enthusiasts have used rocker boxes covers as portals for venting exhaust gases. This process requires a little more work, but it allows a very direct path to the breather which, for the most part, can be hidden. The biggest downside is you will need to remove the rocker cover and provide a threaded tap for the nipples. To do the job right, after you have the covers off, you'll want to thoroughly clean them inside and and out. Then you need to drill and tap to covers to accept an appropriate nipple for the the vent tube. MAP sells just the nipples. With the nipples installed, you'll need to thoroughly clean the inside of the rocker box again to remove any aluminum shavings. If you don't, serious damage could occur to your valve train and other parts of the engine. |
The process is pretty simple, but that also leads to another downside: once you alter the covers, you would need to replace them if you ever wanted to sell the bike as "original," and that could be expensive. Even though this is an improvement to the safety and performance of the bike, there are always those folks who see this as determent to the originality and value.
Tapping into the rocker box is a whole lot easier with the a T140. They have a different rocker box arrangement than the T120. On the 750, all you'll need to do is pull either the 4-bolt or 6-bolt inspection covers (depending on the year) and tap them. You don't need to pull the entire rocker box like you do on the T120. And if you need to replace them for a buyer, the cover is a whole lot cheaper than the T120's rocker box.
Tapping into the rocker box is a whole lot easier with the a T140. They have a different rocker box arrangement than the T120. On the 750, all you'll need to do is pull either the 4-bolt or 6-bolt inspection covers (depending on the year) and tap them. You don't need to pull the entire rocker box like you do on the T120. And if you need to replace them for a buyer, the cover is a whole lot cheaper than the T120's rocker box.
A less elegant solution
In the past, a lot of Triumph owners have chosen to vent gasses though the timing cover. This is especially true for early bikes that didn't have a timing plug. Used timing covers are readily available on on eBay, so you can keep your original cover intact. If you think you may be selling the bike down the road, this may be a good plan. There are always purists who don't want to buy any bike with modifications.
With this solution, you'll need to remove the timing cover and tap it for a nipple, but taking off the timing cover isn't that difficult. Of course, any time you do any machining to an engine case, you have to make sure it is spotless before reinstalling. You don't want aluminum shavings making their way into the cases.
The biggest downside for me with this method is the vent tube is right in front of the engine and highly visible. This may not bother some folks, but I think it takes away from the look of the bike.
The Ultimate Solution...well, maybe
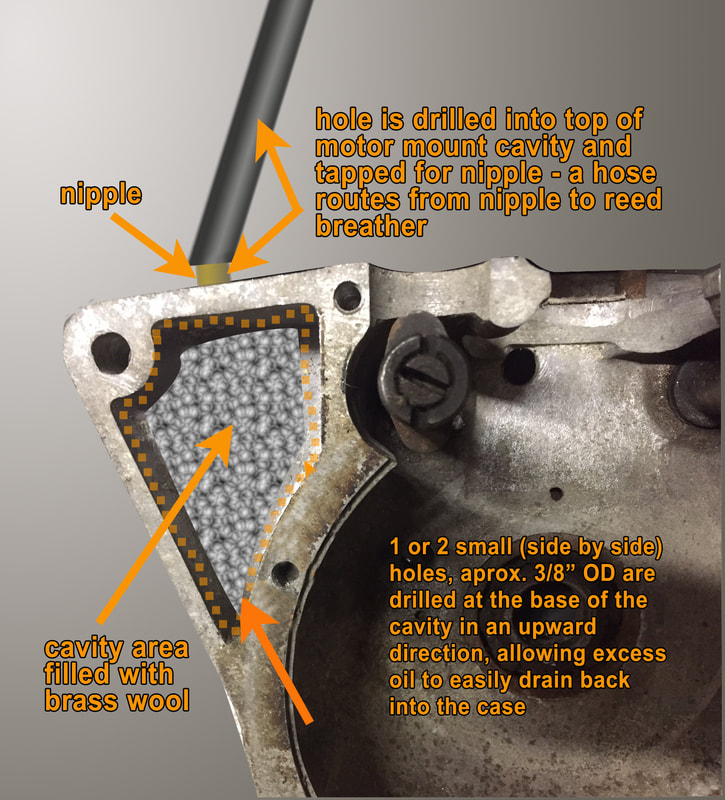
Some racers are said to be using this solution. And it's great because gravity keeps most of the oil in the engine. I have not done this myself, so I don't know how well this works. But the concept is certainly intriguing. The biggest downside with this venting method is that it can only be done with the engine completely disassembled. You also don't want to screw up, or you may be hauling your cases to somebody skilled in TIG welding to fix your mistake.
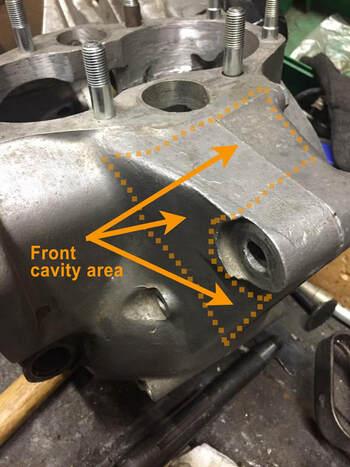
With the case halves apart, a couple of small holes are drilled in an upward direction from the crankcase to the empty cavity in the front of the engine where the engine bolts to the frame. On top of the case, you'll drill and tap a hole for a vent nipple. After drilling, the case is cleaned and the opening stuffed with brass wool before reassembly. The concept supposes that pressure will push the oil-laden gasses through the newly drilled holes into the empty, brass wool-filled chamber. The brass wool will collect most of the oil and the gases will vent thought the nipple. Once the engine shuts down, the oil will drain back into the crankcase. Seems plausible, but like I said before, I haven't tried it myself.
The other downside is you still need to run a vent tube and should run a breather as well. With the tube exiting the front of the engine, the only easy option is to run the vent tube up the down tube(s) of the frame, under the tank and to the rear seat area. This may be a great application for a racing bike, but it seems like a lot of work for most of us non-racing folks.
Catch-as-catch-can?
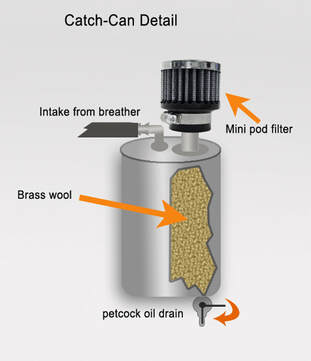
This catch can was designed to allow a pretty fair amount of oil to gather in the container while letting gases vent from the top. I had planned on installing it behind a smaller and more powerful lithium-ion battery sitting in a modified battery box. And, my bike would still look original to someone not looking too close. The smaller battery would allow more room for the container. I was ready to build a customized can when I stumbled on a variety of similar, inexpensive catch cans on eBay. I am still planing on the smaller battery, as it's lighter and more powerful, plus it leaves more room for the catch can.
I decided to included one item from my design into the off-the-shelf-can - a petcock controlled drain in the bottom. I guess I could have also easily incorporated the brass wool baffling, but as there are built-in baffles in the off-the-shelf can, I didn't feel it was necessary. The catch can I purchased from eBay was designed for a car, so it is a little wider than I originally envisioned. The benefit of the added petcock is I don't have to remove the container from the bike for draining. This makes draining the tank a seconds-long procedure instead of a 30-minute process.
You can't go venting crankcase gasses
Whatever method you choose, you can't go wrong with installing some form of breather. It will save you from building up pressure in your crankcase, which keeps you from blowing gaskets and damaging components. I highly recommend adding a catch can as well. If you're careful, you can install a breather without taking away from the beauty of the original bike. And the way I think, a bike is always a lot more attractive when there isn't a puddle of oil under it!
Whatever method you choose, you can't go wrong with installing some form of breather. It will save you from building up pressure in your crankcase, which keeps you from blowing gaskets and damaging components. I highly recommend adding a catch can as well. If you're careful, you can install a breather without taking away from the beauty of the original bike. And the way I think, a bike is always a lot more attractive when there isn't a puddle of oil under it!
