Vintage Bonneville Fuel Line Routing
I created this page because I get quite a few questions about routing fuel lines on Bonneville and Daytona models. The single-carb Tigers and Trophys were much more straight forward. The first Bonneville rolled out the factory 60-plus years ago and most of the survivors have been through numerous hands and dozens of modifications. Most have had a lot of tinkering and replacement of the carbs and fuel line. So, it's understandable that the current routing of the fuel line may not at all resemble the original set up.
This article will address both the original Amal carb set up as well as a the fuel line routing for a Mikuni carburetor conversion.
It's not that the routing of the fuel lines is all that complicated, but it is easier if you have a diagram to study. The routing of the fuel lines vary by model. On earlier years, the fuel lines between the carbs and petcocks were manufactured of coated copper tubing. These lines looked like bathroom plumbing. Later years used a houndstooth rubber line with retaining bands to secure the hose to the petcock and banjo fittings. That was later replaced by black, rubber fuel line and clamps. Rather than show all the different variations of fuel lines clamps, I chose to focus on the routing of the lines. They can still be done in copper or houndstooth if you choose, but the correct routing is what I am trying to display. Another note, these images are not to scale. The lines are oversized so they can easily be visualized and they are shown as rubber, while the clamps are represented with common hose clamps rather than band-style clamps.
The factory Bonneville fuel line routing:
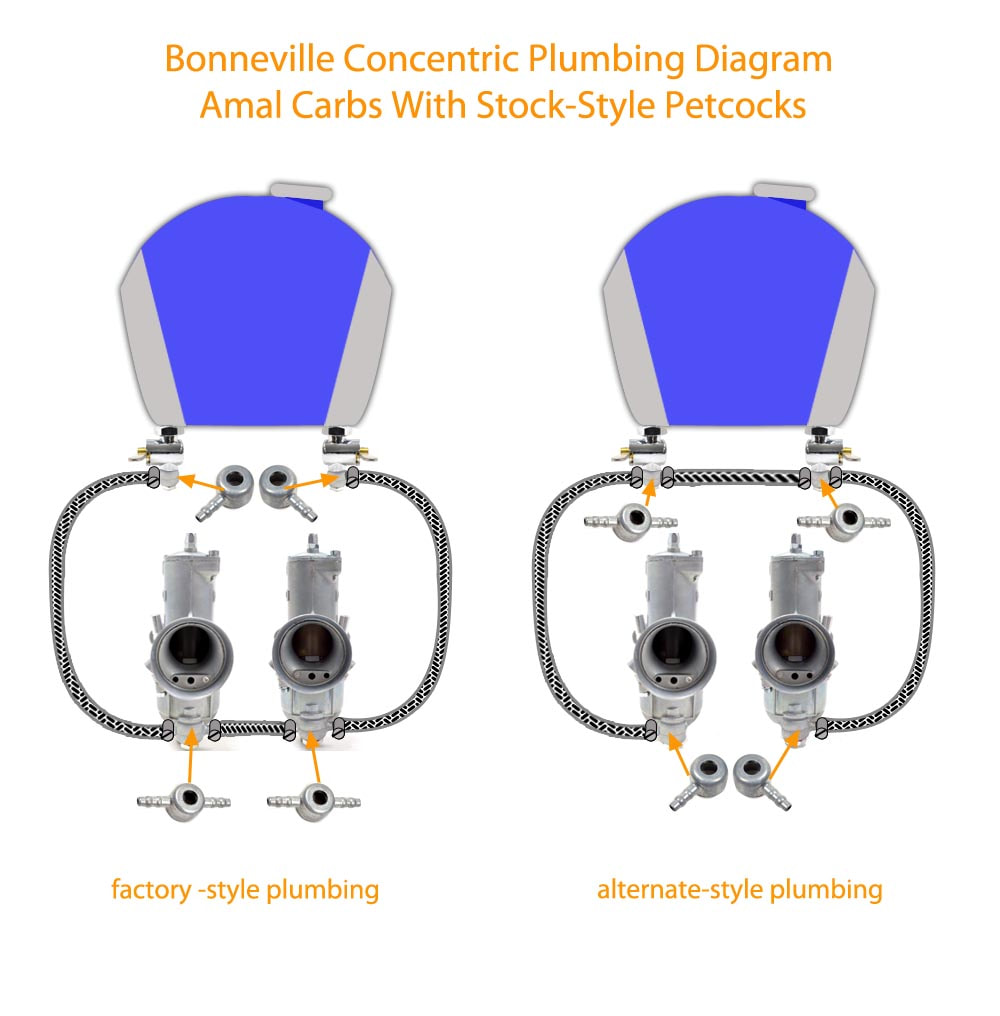
Please click on the image to enlarge diagram.
|
Banjo Fittings
The diagram above shows that the carbs can either be joined at the petcocks or at the carburetors. Typically, they are joined at the carburetors. Banjo fittings are made with barbs that keep the hoses attached to the petcocks and carburetors. In order for the flow of fuel to run from both petcocks, you with need a double banjo fitting at either the carburetor (left image) or the petcocks (right image). These double banjo fittings are the only way fuel can cross-feed from both petcocks to both carbs. As noted below, one petcock is your normal ON petcock while the other keeps you from being stranded miles from a gas station. |
An important note about the petcocks
To keep Bonneville owners from running out of petrol, the factory placed an "ON" petcock on the left side and a "RESERVE" petcock on the right side for most model years. People familiar with Japanese or German petcocks might shake their heads at the absurdity of this set up. They'd be used to have both the ON and RESERVE feature contained on each petcock. But, this old system works well if connected properly.
Typically, a rider turns the valve on the ON petcock down to allow fuel into the bike. The ON petcock has a pickup tube that reaches about 3 inches up from the bottom of the tank. That way, when the fuel level falls below the pickup tube, there will still be fuel in the tank. At that point, the rider would turn on the RESERVE pickup. The RESERVE pickup does not have a pick up tube, so fuel will flow until the tank is empty.
As I mentioned before, it's rare to find a bike that hasn't been messed with . So it's not uncommon to find the RESERVE petcock or the ON petcock has been installed backwards. Or, you may find you do not have a RESERVE petcock. I've also seen two RESERVES petcocks. But, if you want your fuel to work like the factory intended, you'll need to have one of each with the RESERVE on the right side.
Mikuni conversion fuel line routing
The fuel line routing for the MAP Mikuni conversion is somewhat similar to the factory Amal routing, but Mikuni does not offer banjo fittings for VM round-slide carbs. Instead of banjo fittings, we use high quality, bronze T-fittings. As shown in the diagram below, the fuel flow from both petcocks flows into the first T-fitting. That T-fitting is connected to a second fitting that connect the flow to both carbs.
The fuel line routing for the MAP Mikuni conversion is somewhat similar to the factory Amal routing, but Mikuni does not offer banjo fittings for VM round-slide carbs. Instead of banjo fittings, we use high quality, bronze T-fittings. As shown in the diagram below, the fuel flow from both petcocks flows into the first T-fitting. That T-fitting is connected to a second fitting that connect the flow to both carbs.
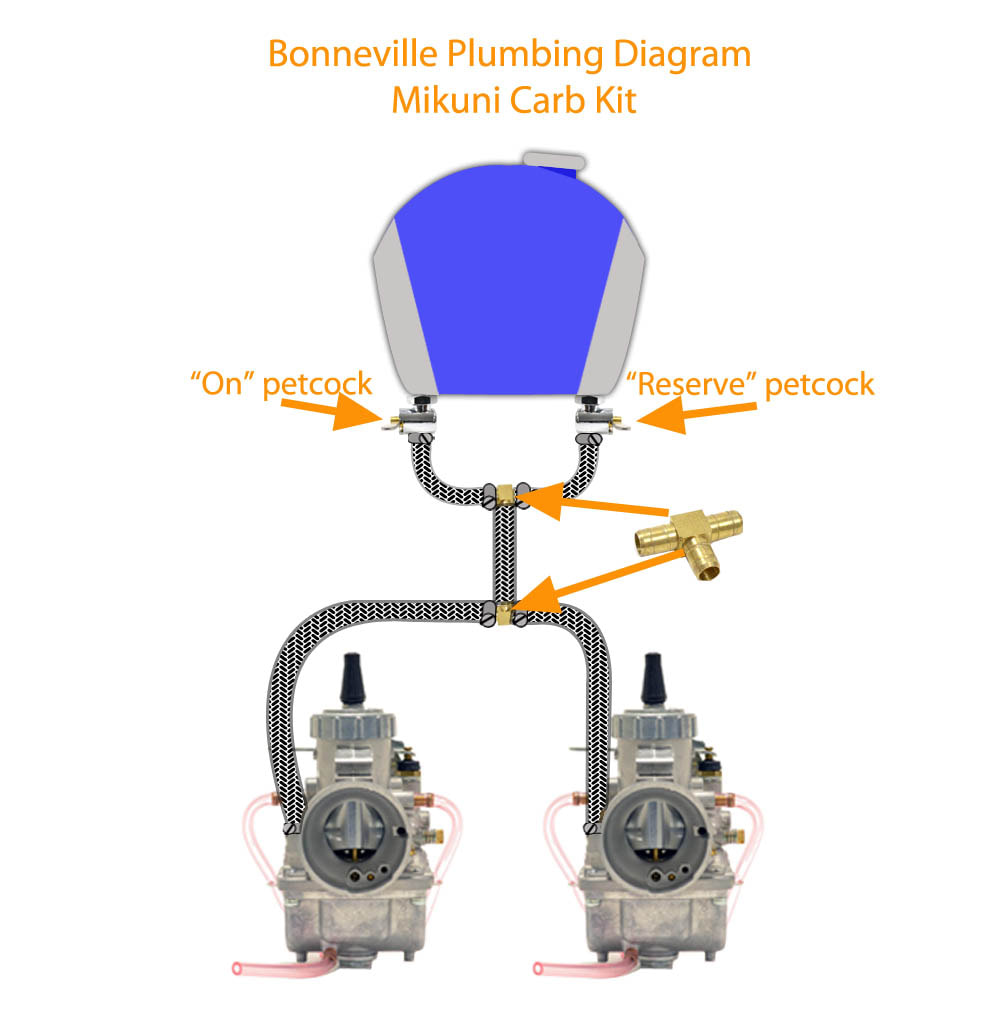
Please click on image to enlarge diagram.
